
OverGem
Making the menu shine
Hiya,
This month, I got a week off from my day-job. I decided to use 40% of that holiday to work on OverGem full-time!
I really missed this feeling of being able to work on games all day. I've learnt so much more in that week alone, compared to the last year of working on it part-time! Just having a good amount of time set out is really helpful, some things can't be done in an evening 😜.
I wanted to share what I learnt in this devlog, and its about shaders! Yeah yeah, I know, I never thought I'd touch it either, but its what I needed. Guess I had to learn it eventually, shaders' all the talk these days.
I marked this log as a 'tutorial' because it fits that description the most. But I want to emphasise that its more of a 'log', a record of how I did a thing. A tutorial implies I am 'knowledgeable', and that I know what I'm doing ... which I don't 🙃 I googled just as much as any newbie to shaders.
Shader for a 'glint' effect
So, what I learnt on my dev-week was turning this:
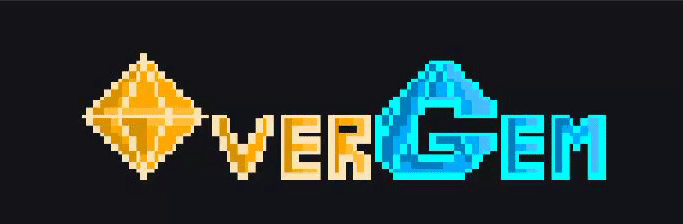
Into this:

I did change the 'O' of the title to just use the same sprites as the in-game OverGem. I also adjusted the sprite of the rest of the title, colouring the 'ver' to be more like the gem and adding white 'shine lines'.
The shader is what gives the sprite that shiny 'glint'.
My approach to this is essentially masking a 'glint' texture on top of the title sprite, and just move the glint horizontally. Excuse me if my terminology is off, I'm not a graphics person 😜
I first had to migrate to URP (Universal Rendering Pipeline) since I started the project with Unity 2019.1, which I believe was when URP was not out of Beta yet. Back then, I didn't see any need to move away from the built-in rendering pipeline either. But, now I do because I plan to use Shader Graphs to create my shaders.
I created the 'glint' texture to have the same dimensions as the title sprite. The texture could be bigger, so long as it can cover the title sprite, but best to make it the same dimensions. The position of the glint on the texture is essentially its starting position before being moved horizontally, so I made it left of the 'ver'.
Texture:

Positioning:

In Unity, I created a Shader Graph: Right click in project explorer -> Create -> Shader -> 2D Renderer -> Sprite Unlit Graph
- In my Shader Graph, I created a
Texture2Dvariable for_MainTex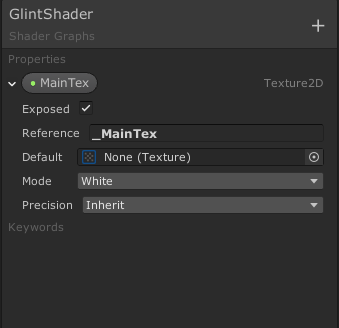
- I then created a
Sample Texture 2Dnode and sampled the_MainTex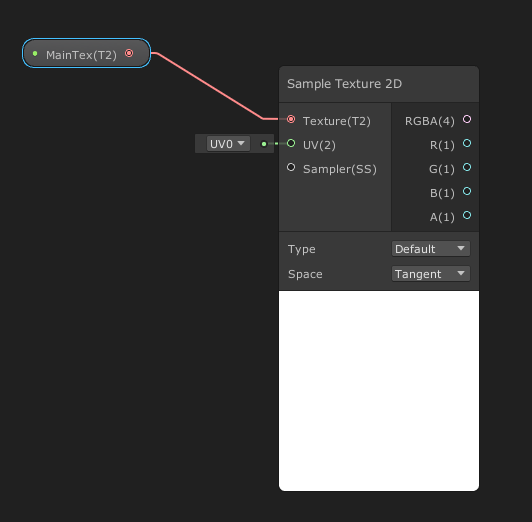
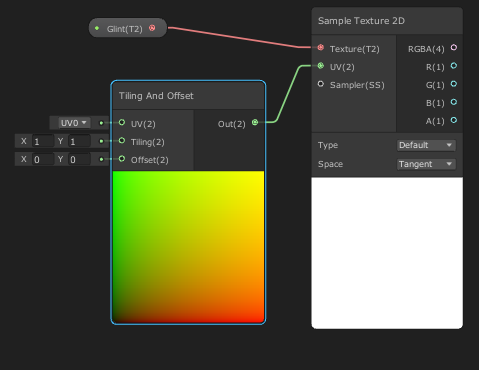
- Then, I created a
Texture2Dvariable for the 'glint' texture, from now on will be referred to as_GlintTex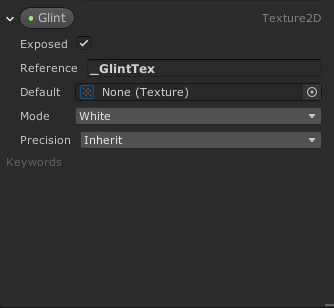
- I created another
Sample Texture 2Dnode and sampled the_GlintTex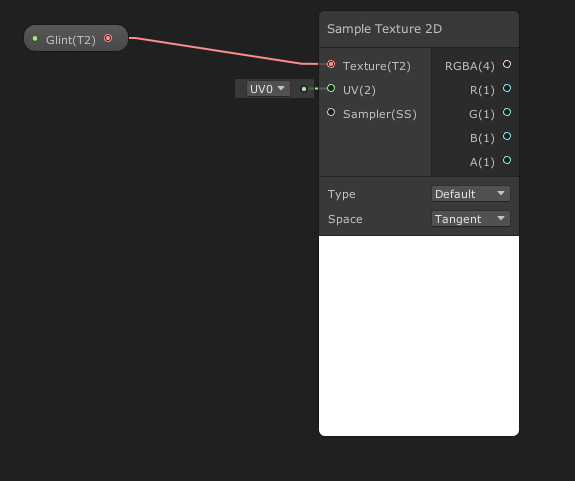
- I created a
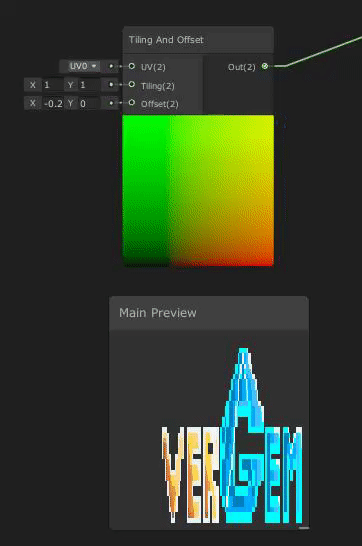
Tiling and Offsetnode, making the output of this node become the input UV for theSample Texture 2Dnode of_GlintTex
- I took the RGB components of the texture samples
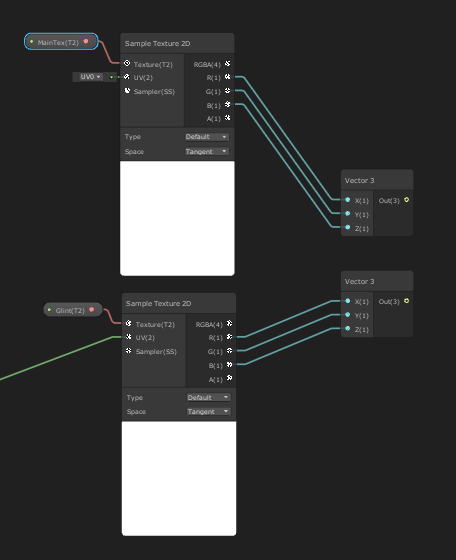
- and created a
Lerpnode, with starting point (A) being the RGB components of_MainTexand end point (B) being the RGB components of_GlintTex. The timestep value for theLerpnode is the alpha value of_GlintTex.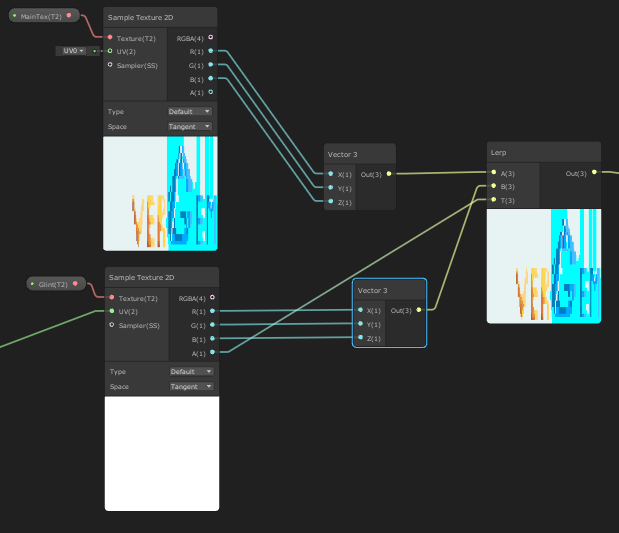
Why did I do this?
TheLerpnode can be used to linearly interpolate between two textures, timestep 0 being the starting texture (A) and timestep 1 being end texture (B).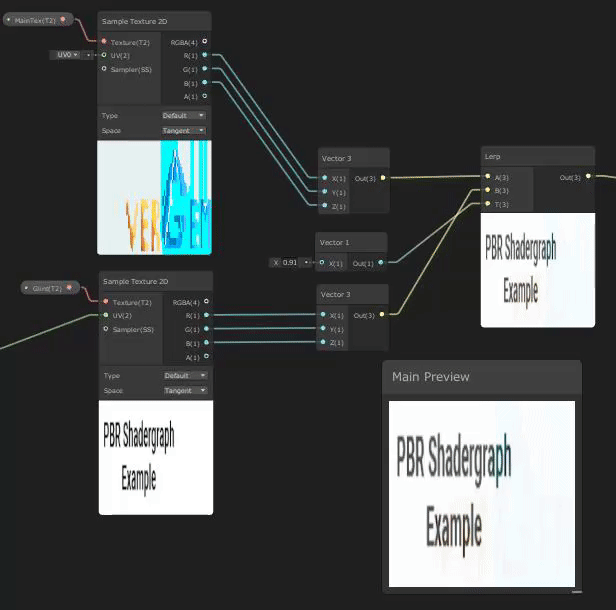
The way I think about shader code is that every function/node is applied to each UV coordinate all at once. For pixel art, I can also think of each UV coordinate as a pixel. So, what I can use theLerpnode for is to mask_GlintTexon top of the title texture (_MainTex), and I can do this by making the timestep value be the alpha of_GlintTex. This means that for each output pixel of theLerpnode, if the_GlintTextexture's alpha is 1 at that pixel, meaning timestep is 1, then_GlintTexRGB value is used (end texture B) . Otherwise, it will be_MainTex's RGB value because alpha, and therefore timestep, will be 0 (starting texture A). Effectively placing_GlintTexon top of_MainTex. - We don't want the full texture of
_GlintTex, which includes pixels outside the title, just the bits where it overlaps with title. We can cut it out by using aSplitnode and aCombinenode. TheSplitnode takes as input the output of theLerpnode in the previous step. The output of theSplitnode becomes input for theCombinenode, except the alpha. The alpha of theCombinenode will be the alpha of the original_MainTex.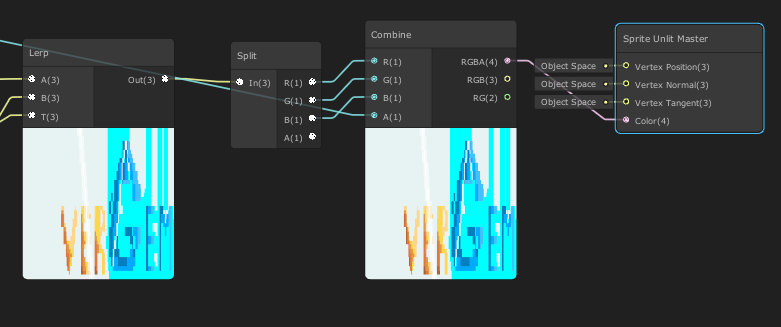
Why this worked:
Since we're using the alpha of the original_MainTextexture, only pixels that make up the title will appear in our final output. The pixels of the_GlintTextexture that was sticking out of the title will not be in the final output, because alpha is 0 where those bits are.

And thats basically it!
Now, I can change the Tiling and Offset node's offset x value, and _GlintTex will move across the _MainTex title texture. Note that negative value is moving right.
My final shader have a variable exposed for offset x, so that I can adjust the it from a script. Here's the full Shader Graph if you want to right click and open to view: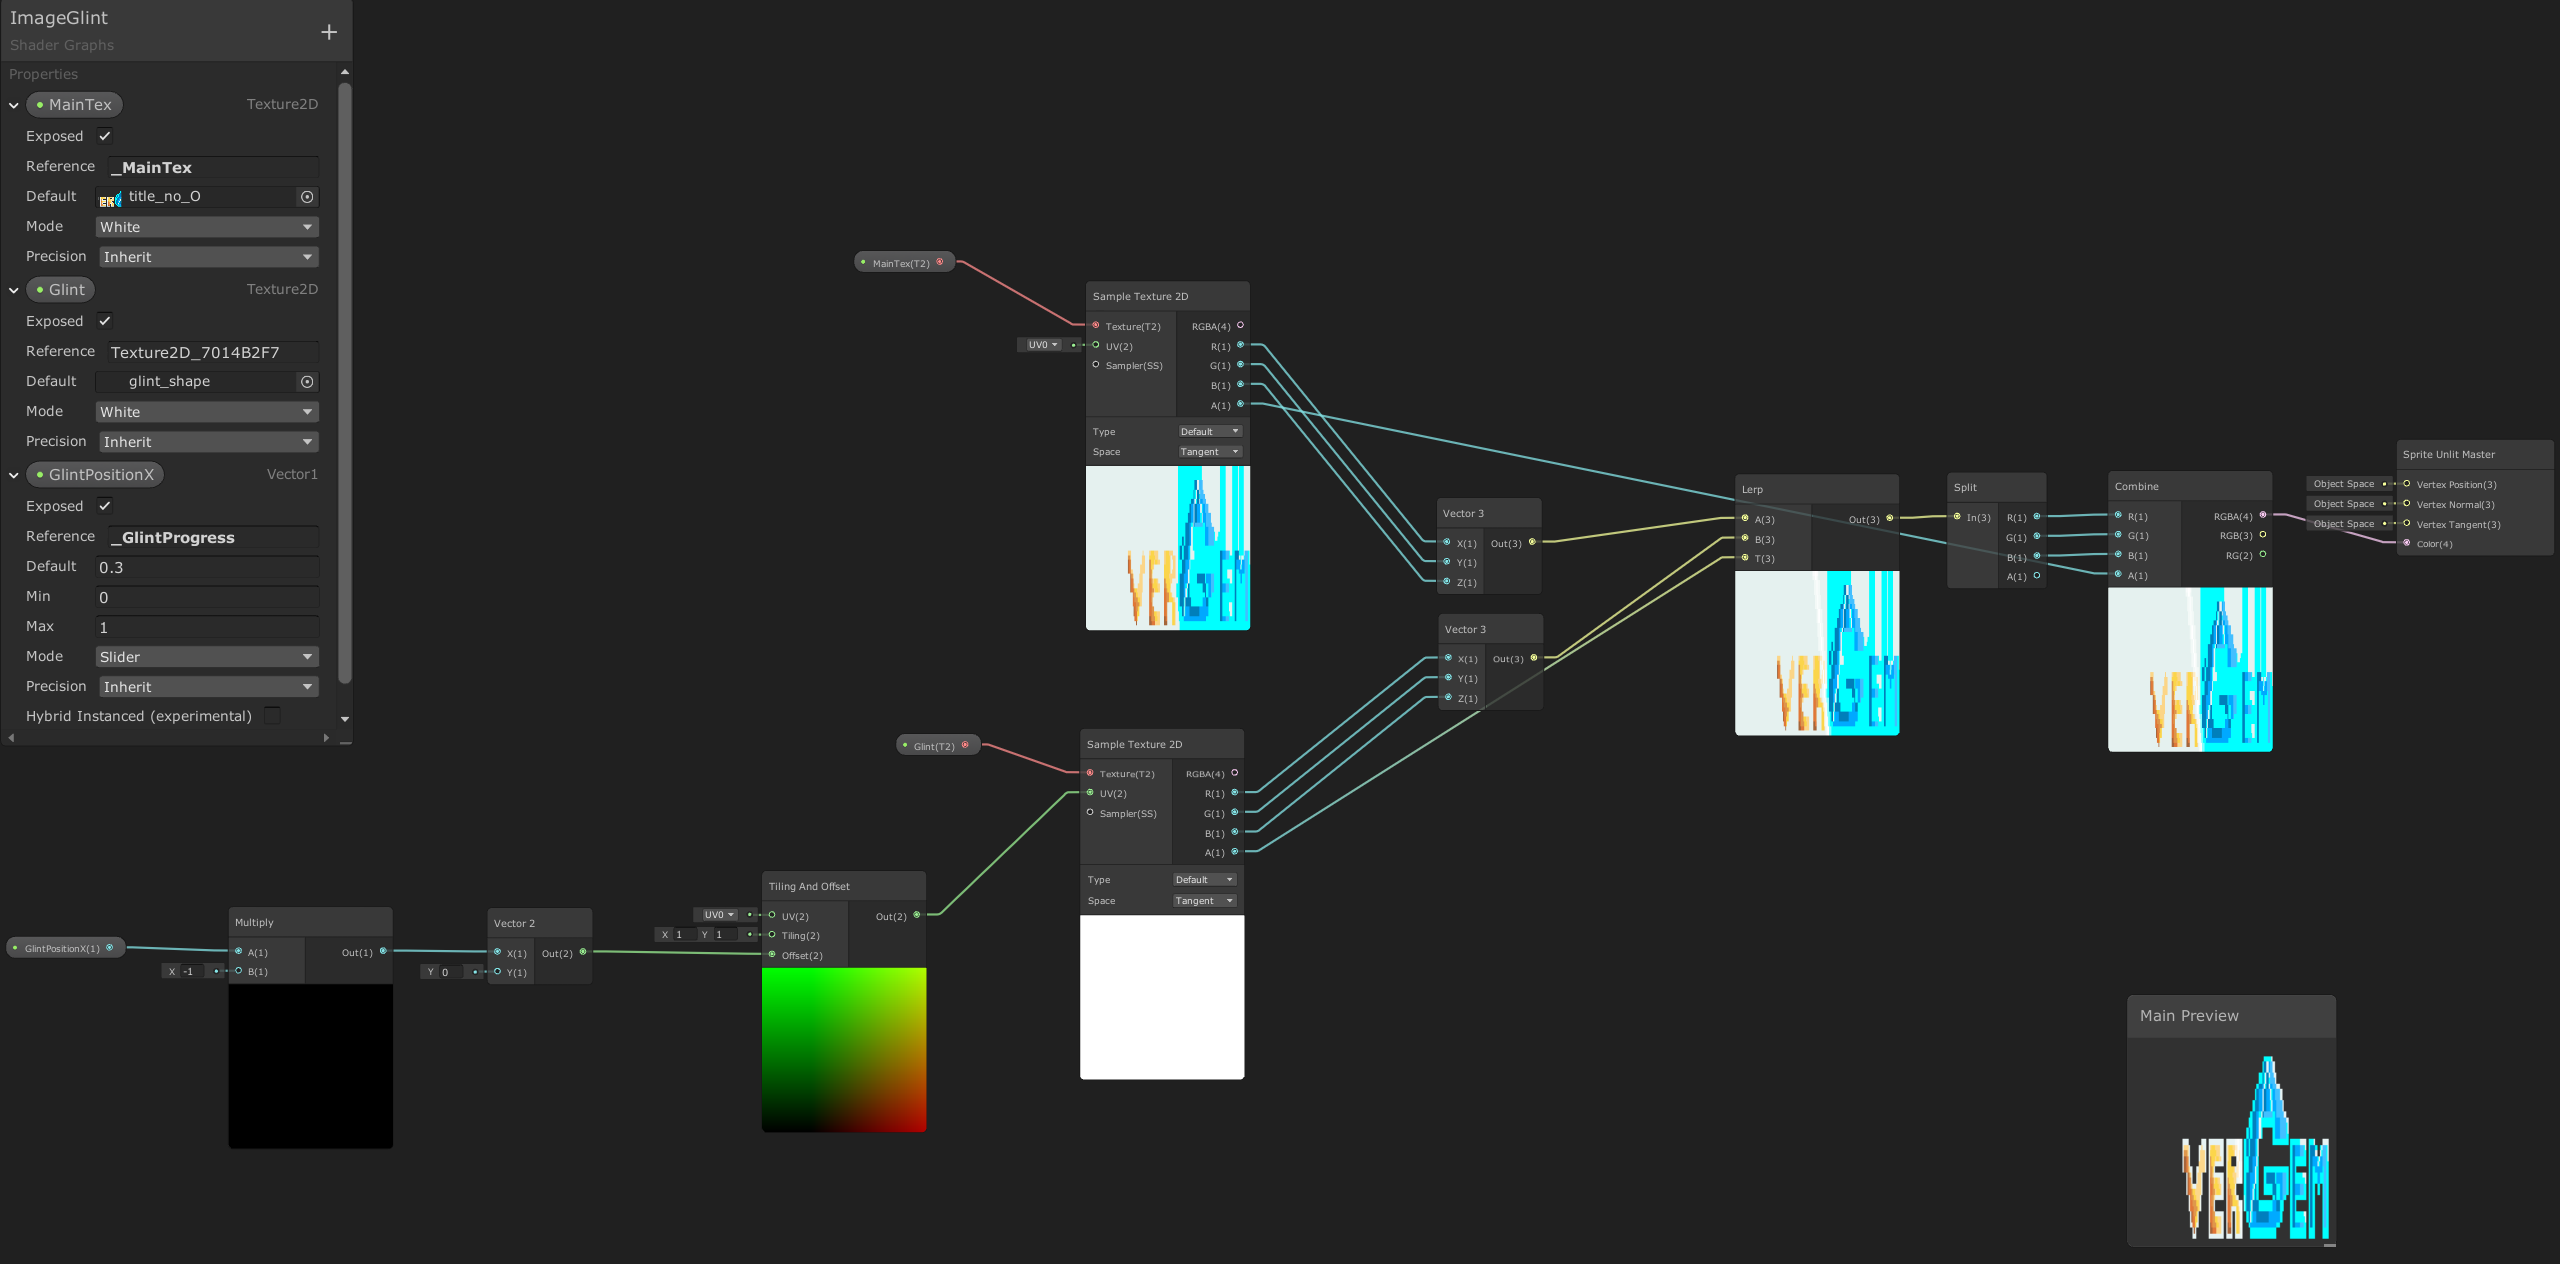
Leave a comment
Log in with itch.io to leave a comment.